
Introduction
Vance AI provides a suite of simple and flexible API endpoints to allow you to integrate our AI image processing features into your app or workflow.
Authentication
The Vance AI API requires authentication via an API token generated within your Vance AI account. You can find the API token in the tab of API & Document on "My Account" page.
All of the methods in the Vance AI API require authentication using an api_token.
In this document we use 1234567890abcdefg as the api_token.
Upload image
Request body
curl -X POST "https://api-service.vanceai.com/web_api/v1/upload" \
     -F "api_token=1234567890abcdefg" \
     -F "file=@/Users/vanceai/Downloads/cat.jpg; filename=cat.jpg" \
<?php
  require 'vendor/autoload.php';
  use GuzzleHttp\Client;

  $http_client = new \GuzzleHttp\Client();

  $res = $http_client->post("https://api-service.vanceai.com/web_api/v1/upload", [
    'multipart' => [
      [
          'name' => 'api_token',
          'contents' => '1234567890abcdefg',
      ],
      [
          'name' => 'file',
          'contents' => fopen('/Users/vanceai/Downloads/cat.jpg', 'r'),
      ]
    ]
  ]);

  echo $res->getBody()->getContents();
?>
# Requires "requests" to be installed (see python-requests.org)
import requests
response = requests.post(
    'https://api-service.vanceai.com/web_api/v1/upload',
    files={'file': open('/Users/vanceai/Downloads/cat.jpg', 'rb')},
    data={'api_token': '1234567890abcdefg'},
)
r = response.json()
if r['code'] == 200:
    print('uid:', r['data']['uid'])
Response Success Example:
{
    "code": 200,
    "cscode": 200,
    "data": {
        "uid": "3f8484a52c47b9cc0c34067b5bdf08d3",
        "name": "'cat.png'",
        "thumbnail": "",
        "w": 1200,
        "h": 1199,
        "filesize": 3618416
    },
    "ip": "54.103.172.45"
}
POST https://api-service.vanceai.com/web_api/v1/upload
To do any actions, you should upload the image first. Let's assume we have an image named cat.jpg and the full path is /Users/vanceai/Downloads/cat.jpg. The dimension of this image is 1200x1200px and the file size is 156KB.
Demo image
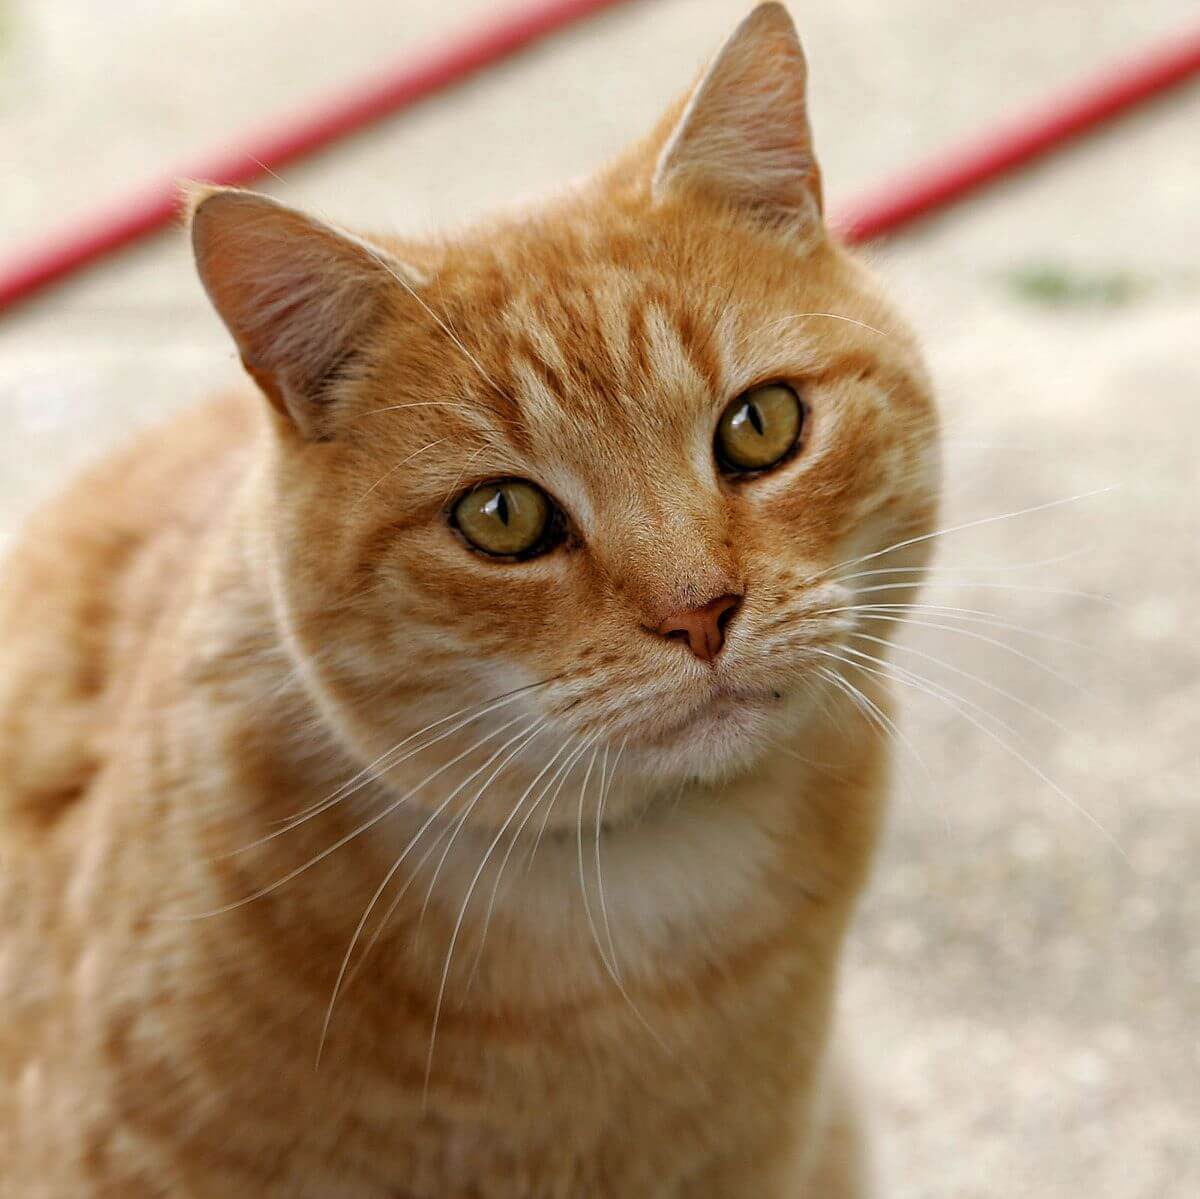
So now, let's upload this image by calling upload endpoint.
Uploading will take some times, that depends on the size of your image and your internet speed.
After uploading, you will get the response content with an uid, which will be used in the transform to process your image.
Supported formats
Currently, the supported file formats are JPG and PNG.
Upload limits
The file size can not be larger than 10MB and the max resolution is 34 Megapixels (short for MP).
For example, if the dimension of your image is 7680x4320, then the resolution is 33 MP (33,177,600 pixels), which is less than 34 MP.
If your image exceeds the limits, you will get an error response, then you should resize or compress your image and try to call the upload again.
Parameters
| Field | Type | Description |
|---|---|---|
| api_token | string | Your API token |
| file | file | Image file object |
| job | string | Optional for AI features. Example: 'ai' for AI features and 'compress' for Compressor. |
Process image
Request body
curl -X POST "https://api-service.vanceai.com/web_api/v1/transform" \
     -d 'api_token=1234567890abcdefg' \
     -d 'uid=eb54870e6a45835c540537f79bc7ce5a' \
     -d 'webhook=https://your-domain/path/to/webhook' \
     -d 'jconfig={
            "job": "enlarge",
            "config": {
              "module": "enlarge",
              "module_params": {
                "model_name": "EnlargeStable",
                "suppress_noise": 26,
                "remove_blur": 26,
                "scale": "2x"
              },
              "out_params": {}
            }
          }'
<?php
  $http_client = new \GuzzleHttp\Client([
    'base_uri' => 'https://api-service.vanceai.com',
    'verify'  => false,
  ]);

  $json_string = file_get_contents("/Users/vanceai/Downloads/enlarge.json");
  $json_string = trim($json_string,chr(239).chr(187).chr(191));

  $response = $http_client->request('POST','/web_api/v1/transform', [
      'form_params' => [
          'api_token' =>  '1234567890abcdefg',
          'uid' => 'b0c5b210dd1a698d0554bca3d1bdd7b4',
          'jconfig' => $json_string,
          'webhook' => 'https://your-domain/path/to/webhook',
      ]
  ]);

  echo $response->getBody()->getContents();
?>
import requests
import json

json_path = "/Users/vanceai/Downloads/enlarge.json"
jparam={}
with open(json_path, 'rb') as f:
    jparam = json.load(f)

data={
    'api_token': '1234567890abcdefg',
    'uid': 'b0c5b210dd1a698d0554bca3d1bdd7b4',
    'jconfig': json.dumps(jparam),
    'webhook': 'https://your-domain/path/to/webhook'
    }
response = requests.post(
    'https://api-service.vanceai.com/web_api/v1/transform',
     data)
r = response.json()
if r['code'] == 200:
    print('trans_id:', r['data']['trans_id'])
Response Success Example:
{
    "code": 200,
    "cscode": 200,
    "data": {
        "trans_id": "6de4b562d1a01c3d2520608eae929646", //Transform Job ID
        "status": "webhook", // waiting, finish, fatal, process, webhook
    },
    "ip":"54.103.172.45"
}
POST https://api-service.vanceai.com/web_api/v1/transform
When we get the uid in the first upload step, we can use it to call the transform endpoint.
The transform needs 3 parameters at least. Besides api_token and uid, we also need an AI configuration in json format as the value of jconfig.
Assume we have an AI enlarger config file stored in Downloads folder, so the full path is /Users/vanceai/Downloads/enlarge.json.
Parameters
| Field | Type | Description |
|---|---|---|
| api_token | string | Your API token |
| uid | string | ID of uploaded file |
| jconfig | string | Transform parameter in json format |
| webhook | string | [Optional]The callback url to receive the transfrom result notification. |
Status of job processing
You may get different job status from the transform response. These statuses indicate different processing results of your job.
| Status | Description |
|---|---|
| finish | The job has finished, now you can download the result with the trans_id |
| waiting | Your job is waiting to be assigned in the queue, all servers are busy, you may need to wait for a while. |
| fatal | Your job is failed, you can try again or contact us. |
| process | Your job is still being processed, please wait a secend. |
| webhook | You see this status, because you provided the webhook url, so it means the processing result will be sent via webhook. |
| busy | It means your job is in the queue, you may need to call "progress" to query the status in a fixed frequency, such as to query the status ever 2 seconds. |
Webhook
The webhook is an optional parameter, which is used to receive message of job processing result. To use webhook, you should set the webhook field to point to your webserver in our transform request body. This url can be http or https.
If you provide the callback url, then the transform will response immediately after calling instead of waiting for the process result.
You will get a trans_id from the transform response body. Once the job finished, we will send a POST request to the endpoint you specified with webhook. You can also query the progress with the trans_id by calling the progress endpoint.
Example: https://your.domain/path/to/webhook
Note: the protocol must be https.
Check the progress
Request body
curl -X POST "https://api-service.vanceai.com/web_api/v1/progress" \
       -d 'api_token=1234567890abcdefg' \
       -d 'trans_id=6de4b562d1a01c3d2520608eae929646' \
<?php
  $remoteFileUrl = 'https://api-service.vanceai.com/web_api/v1/progress?trans_id=fe854a3b20237f70d1efb757b6aa0cc4&api_token=1234567890abcdefg';

  $ch = curl_init();
  $timeout = 60;
  curl_setopt($ch, CURLOPT_URL, $remoteFileUrl);
  curl_setopt($ch, CURLOPT_RETURNTRANSFER, 1);
  curl_setopt($ch, CURLOPT_CONNECTTIMEOUT, $timeout);
  $img = curl_exec($ch);
  curl_close($ch);
?>
remoteFileUrl = 'https://api-service.vanceai.com/web_api/v1/progress?trans_id=fe854a3b20237f70d1efb757b6aa0cc4&api_token=1234567890abcdefg''
response = requests.get(remoteFileUrl)
r = response.json()
if r['code'] == 200:
    print('status:', r['data']['status'])
Response Success Example:
{
    "code": 200,
    "cscode": 200,
    "data": {
        "status": "finish", // waiting, finish, fatal, process
        "filesize": "16794935"
    },
    "ip": "54.103.172.45"
}
GET|POST https://api-service.vanceai.com/web_api/v1/progress
We recommend you to use this endpoint in two situations:
If you didn't provide the
webhookurl, useprogressto query the processing status when received the timeout response.If you've already provided the
webhookurl, use this endpoint to query the processing status when you can not get message from our server.
Parameters
| Field | Type | Description |
|---|---|---|
| api_token | string | Your API token |
| trans_id | string | ID in transform response |
Download result
Request body
curl -X POST "https://api-service.vanceai.com/web_api/v1/download" \
     -o /Users/vanceai/Downloads/enlarged-cat.jpg \
     -d 'api_token=1234567890abcdefg' \
     -d 'trans_id=6de4b562d1a01c3d2520608eae929646' \
<?php
  $remoteFileUrl = 'https://api-service.vanceai.com/web_api/v1/download?trans_id=fe854a3b20237f70d1efb757b6aa0cc4&api_token=1234567890abcdefg';

  dst_path = '/path/to/save/demo.jpg';

  $ch = curl_init();
  $timeout = 60;
  curl_setopt($ch, CURLOPT_URL, $remoteFileUrl);
  curl_setopt($ch, CURLOPT_RETURNTRANSFER, 1);
  curl_setopt($ch, CURLOPT_CONNECTTIMEOUT, $timeout);
  $img = curl_exec($ch);
  curl_close($ch);

  $fp2 = @fopen(dst_path, 'a');
  fwrite($fp2, $img);
  fclose($fp2);
?>
remoteFileUrl = 'https://api-service.vanceai.com/web_api/v1/download?trans_id=fe854a3b20237f70d1efb757b6aa0cc4&api_token=1234567890abcdefg'
dst_path = '/path/to/save/demo.jpg'

response = requests.get(remoteFileUrl, stream=True)

f = open(dst_path, "wb")
for chunk in response.iter_content(chunk_size=512):
    if chunk:
        f.write(chunk)
f.close()
GET|POST https://api-service.vanceai.com/web_api/v1/download
Once the status of the job is finish, we should use download endpoint to save the result.
Let download the result to the path of '/Users/vanceai/Downloads/' and named it as 'enlarged-cat.jpg'.
Parameters
| Field | Type | Description |
|---|---|---|
| api_token | string | Your API token |
| trans_id | string | ID in transform response |
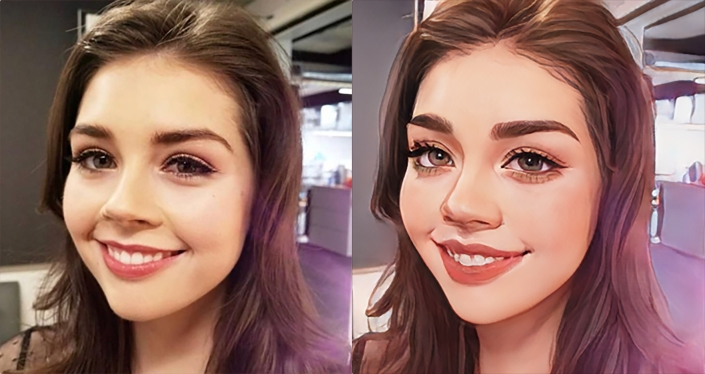
Comparison of before and after
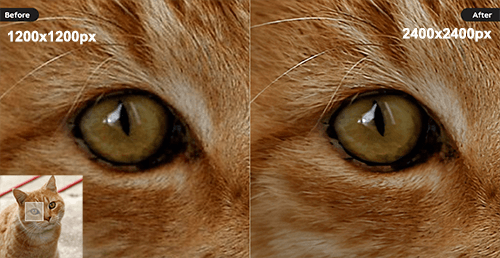
As you can see, the cat.jpg has been enlarged by 200%, the output dimension is 2400x2400px, but the quality is not lost, even better than before.
Errors
Response Error Example
{
    "code": 10001,
    "msg": "Illegal Parameter"
}
OR
{
    "code": 30001,
    "msg": {
           "api_token": [
                 "The api token field is required."
            ]
     }
}
The VanceAI API uses the following error codes:
| Error Code | Meaning |
|---|---|
| 10001 | Illegal parameter |
| 10010 | Internal error |
| 10011 | File doesn't exist OR Invalid download link |
| 10012 | Resolution or file size exceeds the limits. |
| 10013 | jparam parse error |
| 10014 | Job failed and exited for unexpected reason |
| 30001 | Invalid API token |
| 30004 | Insufficient credits |
API Management
API Usage
Check credit balance
Request body
curl -X GET "https://api-service.vanceai.com/web_api/v1/point?api_token=1234567890abcdefg"
Response Success Example
{
    "code": 200,
    "cscode": 200,
    "data": {
        "max_num": "500.000", // Total Credits
        "used_num": "107.800" // Used Credits
    },
    "ip": "54.103.172.45"
}
GET https://api-service.vanceai.com/web_api/v1/point
You can use this endpoint to query your credit balance.
Parameters
| Field | Type | Description |
|---|---|---|
| api_token | string | Your API token |
Credit usage history
Request body
curl -X POST "https://api-service.vanceai.com/web_api/v1/points/record" \
     -d 'api_token=1234567890abcdefg' \
     -d 'page=1' \
     -d 'limit=20' \
Response Success Example
{
    "code": 200,
    "cscode": 200,
    "data": {
        "datas": [
            {
                "point_type": "download", // job or download
                "job": "denoise",         //job type
                "info": "denoise_SwJes_0.jpg.jpg", // Image name
                "point": "1.000",         // Credits cost for this job or download
                "balance": "392.200",     // Credit balance
                "created_at": "2021-12-14 04:36:18"
            }
        ],
        "current_page": 1,
        "last_page": 5,
        "per_page": 20,
        "total": 100
    }
    "ip": "54.103.172.45"
}
GET|POST https://api-service.vanceai.com/web_api/v1/points/record
You can use this endpoint to query your credit usage history.
Parameters
| Field | Type | Description |
|---|---|---|
| api_token | string | Your API token |
| page | numeric | [Optional] The xth page of pagination. Default: 1 |
| limit | numeric | [Optional] The number of items to display per page. Default: 20 |
Credit Costs
Each AI feature has its own value. Currently most of the features will cost 1 credit when you download the result, some features will cost 2 credits. Duplicate downloads won't charge credits again.
Features that will cost 2 credits: * AI Image Sharpener
Config Files
VanceAI currently has 10+ AI features for image enhancement, each one has one config file at least. And we are continue to add more AI features which will cover the fields of image, video and music.
Generally, all the config files have a fixed structure. let's take an example by using AI Sharpener.
Structure of config file
Configuration is required when calling transform endpoint.
Example of Configuration
{
    "config":[
        {
            "name":"va_sharpen_standard",
            "config":{
                "module":"sharpen3",
                "module_params":{
                    "model_name":"SharpenGeneralStable",
                    "blur_type":1,
                    "remove_blur":0.5,
                    "suppress_noise":0.5,
                    "remove_artifacts":0.5,
                    "autoparams":true,
                    "automodel":true
                }
            }
        },
        {
            "name":"CodeFormer",
            "config":{
                "module":"CodeFormer",
                "module_params":{
                    "model_name":"CodeFormerStable"
                },
                "out_params":{
                    "compress":{
                        "quality":80
                    }
                }
            }
        }
    ],
    "name":"va_sharpen_standard"
}
In this configuration, you can see there are 2 items in the config array, the server will process your image in the order of the items.
The demo code provides a two-step workflow, the 1st step will sharp your photo and the 2nd step will enhance the human faces in your photo.
Supported output parameters
| Settings | Type | Example | Note |
|---|---|---|---|
| Quality | int | {"compress": {"quality": 95}} | The range is 0-100, the higher the number, the compress the less. |
| DPI | int | {"dpi": 300} | The range is 0-2000 (suggested). Generally, 300 or 350 is suitable for print. |
| Format | string | {"format": "png"} | Now we only accept jpg and png. |
| Background Color | int | {"bg_composed": {"bg_color": {"r": 0, "g": 255, "b": 255}}} | This can be used to set a solid background color to the background removed photo. |
Description of config file
AI Image Enlarger
AI Image Enlarger
{
    "name": "enlarge3",
    "config": {
        "module": "enlarge3",
        "module_params": {
            "model_name": "EnlargeStandard_2x_Stable",
            "suppress_noise": 40,
            "remove_blur": 60,
            "scale": 2
        }
    }
}
Enlarge image up to 800% while keeping high quality.
| Key | Value | Description |
|---|---|---|
| name | enlarge3 | |
| module | enlarge3 | |
| model_name | EnlargeStandard_2x_Stable | You can use "2x" or "4x" in this model name. When using "2x", the scale value must be 2 (The value type is int, not string), and when using "4x", the scale value can be 4, 6 or 8. |
| suppress_noise | 0 - 100 | 40 by default. |
| remove_blur | 0 - 100 | 60 by default. |
| scale | 2, 4, 6, 8 | Accept number, not string. |
AI Image Denoiser
AI Image Denoiser
{
    "name": "denoise",
    "config": {
        "module": "denoise",
        "module_params": {
            "model_name": "DenoiseStable",
            "auto_params": true,
            "remove_noise": 75,
            "sharpen" : 75
        }
    }
}
It removes grain and noise from photo effortlessly through AI-powered denoise algorithms.
| Key | Value | Description |
|---|---|---|
| name | denoise | |
| module | denoise | |
| model_name | DenoiseStable | |
| auto_params | true or false | If true, then remove_noise and sharpen will be ignored. AI will select property values automatically according to the training. |
| remove_noise | 0 - 100 | 75 by default. |
| sharpen | 0 - 100 | 75 by default. |
AI Image Sharpener
AI Image Sharpener
{
    "name":"va_sharpen_standard",
    "config":{
        "module":"sharpen3",
        "module_params":{
            "model_name":"SharpenGeneralStable",
            "remove_blur":0.5,
            "suppress_noise":0.5,
            "remove_artifacts":0.5,
            "autoparams":true,
            "automodel":true
        }
    }
}
| Key | Value | Description |
|---|---|---|
| name | va_sharpen_standard | |
| module | sharpen3 | |
| model_name | SharpenGeneralStable | |
| autoparams | true or false |
If true, then other parameters will be ignored. AI will select property values automatically according to the training. |
| automodel | true or false |
If true, the system will auto select the best AI model to process your photo. |
| remove_blur | 0 - 1.00 | 0.5 by default |
| suppress_noise | 0 - 1.00 | 0.5 by default |
| remove_artifacts | 0 - 1.00 | 0.5 by default |
AI Background Remover
AI Background Remover
This config is mainly for object coutout.
{
    "name": "matting",
    "config": {
        "module": "matting",
        "module_params": {
            "model_name": "MattingStable"
        }
    }
}
| Key | Value | Description |
|---|---|---|
| name | matting | |
| module | matting | |
| model_name | MattingStable |
AI Anime Upscaler
AI Anime Upscaler - 4x_AnimeSharp
{
  "name": "chainner",
  "config": {
    "module": "chainner",
    "module_params": {
      "model_name": "Anime_4x_AnimeSharp",
      "scale": "2x"
    }
  }
}
Model of 4x_AnimeSharp
| Key | Value | Description |
|---|---|---|
| name | chainner | |
| module | chainner | |
| model_name | Anime_4x_AnimeSharp | |
| scale | 2x, 4x, 8x |
AI Anime Upscaler - real_esrgan
{
    "name":"real_esrgan",
    "config": {
        "module":"real_esrgan",
        "module_params": {
            "model_name": "RealEsrganStable",
            "scale": "2x"
        }
    }
}
Model of RealEsrgan
| Key | Value | Description |
|---|---|---|
| name | real_esrgan | |
| module | real_esrgan | |
| model_name | RealEsrganStable | |
| scale | 1x, 2x, 4x, 6x, 8x | If selected 1x, it will only enhance the quality without enlargement. |
AI Photo Restorer - Fix
AI Photo Restorer - Fix
{
    "name": "crease_repair",
    "config": {
        "module": "crease_repair",
        "module_params": {
            "model_name": "CreaseRepairStable"
        }
    }
}
This feature will fix the scratches, creases and spots on the photo.
| Key | Value | Description |
|---|---|---|
| name | crease_repair | |
| module | crease_repair | |
| model_name | CreaseRepairStable |
AI Photo Restorer - Enhance
AI Photo Restorer - Enhance
{
    "name": "img2sr",
    "config": {
        "module": "img2sr",
        "module_params": {
            "model_name": "style_sr_512",
            "face_enhancer": true,
            "strength": 0.9
        }
    }
}
This feature will enhance the quality, don't use it unless your photo is very blurry.
| Key | Value | Description |
|---|---|---|
| name | img2sr | |
| module | img2sr | |
| model_name | style_sr_512 | |
| face_enhancer | true or false |
It will enhance the faces with codeformer's AI model if true. |
| strength | 0.80 ~ 1.00 | It may useful to adjust the output quality, 0.9 by default. |
Toongineer Cartoonizer (Deprecated)
Toongineer Cartoonizer
{
    "name": "cartoonize",
    "config": {
        "module": "cartoonize",
        "module_params": {
            "model_name": "CartoonizeStable"
        }
    }
}
| Key | Value | Description |
|---|---|---|
| name | cartoonize | |
| module | cartoonize | |
| model_name | CartoonizeStable |
AI Image Cartoonizer
AI Image Cartoonizer
{
  "name":"img2anime",
  "config":{
    "module":"img2anime",
    "module_params":{
        "model_name":"style1",
        "prompt":"",
        "overwrite": false,
        "denoising_strength": 0.75
    }
  },
  "cn_configs":  [
    // here you can use one or more `cn_name` to get the effect you want.
    {
      "image_uid": "<uid_from_upload>",
      "cn_name": "cartoon_tile"
    },
    {
      "image_uid": "<uid_from_upload>",
      "cn_name": "cartoon_lineart"
    }
  ]
}
This feature is based on Stable Diffusion.
| Key | Value | Description |
|---|---|---|
| name | img2anime | The key of this feature |
| module | img2anime | |
| model_name | string, style1, style2, ... style6 |
We provide 12 styles for male and female. |
| prompt | string, empty by default |
You can input some words to descripbe your photo, 140 characters at most. English only. |
| overwrite | bool, true or false |
If true, only your prompt will be used. |
| denoising_strength | float, 0.00 - 1.00 |
0.75 by default, you will need to change it according to the style you use. |
| image_uid | string |
The uid you get from the Upload endpoint |
| cn_name | string |
Such as; cartoon_tile, cartoon_lineart, you can choose from the table below. |
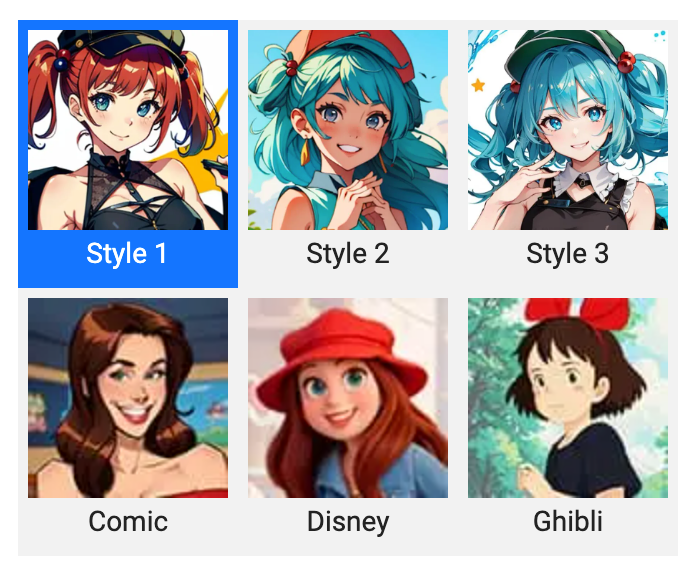
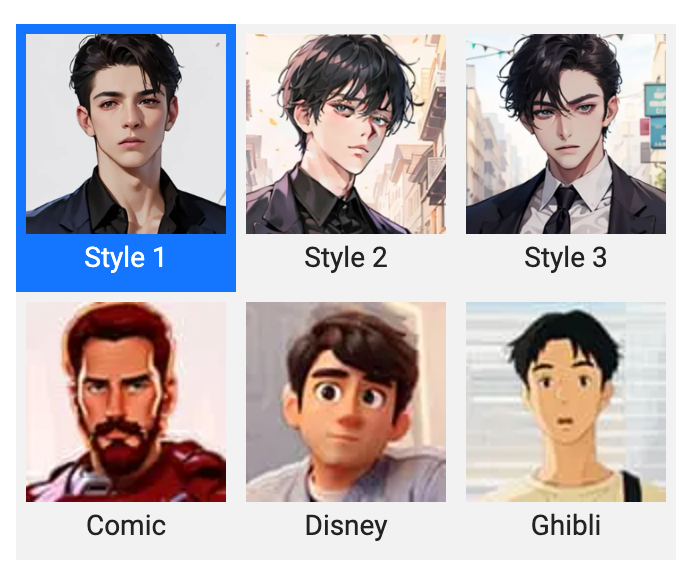
The base models we are using:
| Style | Base Model | Lora |
|---|---|---|
| style1 | darkSushiMixMix_225D.safetensors | |
| style2 | toonyou_beta3.safetensors | |
| style3 | meinamix_meinaV9.safetensors | |
| style4 | deepboys25D_v30.safetensors | |
| style5 | pastelboys2D_v30.safetensors | |
| style6 | blueboys2D_v30.safetensors | |
| us_comic_boy | comicBabes_v2.safetensors | |
| us_comic_girl | comicBabes_v2.safetensors | |
| disney_boy | disneyPixarCartoon_v10.safetensors | |
| disney_girl | disneyPixarCartoon_v10.safetensors | |
| Ghibli_boy | meinamix_meinaV9.safetensors | ghibli_style_offset |
| Ghibli_girl | meinamix_meinaV9.safetensors | ghibli_style_offset |
The cn_name and denoising_strength for each style
| Style | More cartoonish | More realistic |
|---|---|---|
| style1 | cartoon_tile |
cartoon_lineart and cartoon_tile |
| style2 | cartoon_tile |
cartoon_lineart and cartoon_tile |
| style3 | cartoon_tile |
cartoon_lineart and cartoon_tile |
| style4 | cartoon_tile |
cartoon_lineart and cartoon_tile |
| style5 | cartoon_tile |
cartoon_lineart and cartoon_tile |
| style6 | cartoon_tile |
cartoon_lineart and cartoon_tile |
| us_comic_boy | cartoon_normal |
cartoon_canny |
| us_comic_girl | cartoon_normal |
cartoon_canny |
| disney_boy | more_cartoon_lineart |
more_real_lineart |
| disney_girl | more_cartoon_lineart |
more_real_lineart |
| Ghibli_boy | cartoon_normal_noforge |
cartoon_normal_noforge |
denoising_strength: 0.75 |
denoising_strength: 0.65 |
|
| Ghibli_girl | cartoon_normal_noforge |
cartoon_normal_noforge |
denoising_strength: 0.75 |
denoising_strength: 0.65 |
Female Style
Male Style
VancePortrait
VancePortrait - AnimeGANv2
{
    "job": "animegan",
    "config": {
        "module": "animegan2",
        "module_params": {
            "model_name": "Animegan2Stable",
            "single_face": true
        }
    }
}
Model of AnimeGANv2
This model will convert portrait to anime style.
| Key | Value | Description |
|---|---|---|
| job | animegan | |
| module | animegan2 | |
| model_name | Animegan2Stable | |
| single_face | true or false | Set to true to only convert human face. Default: true |
AI Photo Colorizer (Recolor)
AI Photo Colorizer (Recolor)
{
    "name": "recolor",
    "config": {
        "module": "sd_recolor",
        "module_params": {
            "model_name": "sd_recolor",
            "prompt": "",
            "negative_prompt": ""
        }
    }
}
This feature is based on Stable Diffusion, and we use the recolor preprocessor.
| Key | Value | Description |
|---|---|---|
| name | colorize | |
| module | sd_recolor | |
| model_name | sd_recolor | |
| prompt | empty by default | You can write some words to specify the color you want, like blue skirt, black hair, etc. |
| negative_prompt | empty by default | The color you don't want to be displayed on the output image. |
AI Photo Colorizer (Deoldify)
AI Photo Colorizer (Deoldify)
{
    "name": "colorize",
    "config": {
        "module": "deoldify2",
        "module_params": {
            "model_name": "DeoldifyArtistic",
            "render_factor": 30
        }
    }
}
This feature uses the deoldify model.
| Key | Value | Description |
|---|---|---|
| name | colorize | |
| module | deoldify2 | This is based on the famous deoldify project. |
| model_name | DeoldifyArtistic | |
| render_factor | 10 - 70 | Default: 30 |